Set up Maester in Azure DevOps
This guide will walk you through setting up Maester in Azure DevOps and automate the running of tests using Azure DevOps Pipelines.
Why Azure DevOps?
Azure DevOps is a great way to automate the daily running of Maester tests to monitor your tenant. You can use Azure DevOps to run Maester tests on a schedule, such as daily, and view the results in the Azure DevOps interface.
Azure DevOps comes with a free tier that includes 1,800 minutes of Maester test runs per month (unlimited hours if you use a self-hosted agent).
Azure DevOps has native integration with Microsoft Entra including single sign on, user and group management as well as support for conditional access policies.
Set up the Maester repository in Azure DevOps
Pre-requisites
- If this is your first time using Azure DevOps, you will first need to create an organization.
- Azure DevOps - Create an organization
tip
To enable the free tier, to use a Microsoft-hosted agent, for Azure Pipelines you will need to submit this form https://aka.ms/azpipelines-parallelism-request (it can take a few days before you can use the pipeline.) In the interim you can use a self-hosted agent to get started.
- Azure DevOps - Create an organization
- Create a new project to host your Maester tests and Azure Pipeline.
Create the repository for your pipeline
The built-in Maester tests ship inside the Maester PowerShell module, so you don't need to import or copy any tests. The repository only holds your pipeline definition and, optionally, your own custom tests and maester-config.json.
- Select Repos from the left-hand menu
- In the Initialize main branch with a README or gitignore section, select Initialize to create the default repository for your project.
- Optionally, to add your own tests and configuration, clone the repository and run
Install-MaesterTestsin it. This creates acustomfolder and a startermaester-config.jsonthat you can commit. See Writing custom tests and Run configuration.
Set up the Azure Pipeline
There are many ways to authenticate with Microsoft Entra in Azure DevOps. We recommend using workload identity federation as it is more secure, requires less maintenance and is the easiest to set up.
If you’re unable to use more advanced options like certificates stored in Azure Key Vault, which need an Azure subscription, there’s also guidance available for using client secrets.
- Workload identity federation (recommended) uses OpenID Connect (OIDC) to authenticate with Microsoft Entra protected resources without using secrets.
- Client secret uses a secret to authenticate with Microsoft Entra protected resources.
- Workload identity federation (recommended)
- Client secret
Pre-requisites
- An Azure subscription is required for this method.
- If you don't have an Azure subscription, you can create one by following Create a Microsoft Customer Agreement subscription or ask your Azure administrator to create one.
Create an empty Azure Resource Group
This empty resource group is required to set up workload identity federation authentication. No Azure resources will be created in this resource group and there are no costs associated with it.
- Browse to the Azure portal and open the Resource groups blade.
- Select + Create.
- Enter a name for the resource group (e.g.
Maester-Resource-Group) - Select any region
- Select Review + create > Create
Create a new workload identity federation service connection
- In the Azure DevOps project, go to Project settings > Service connections.
- Select New service connection, and then select Azure Resource Manager.
- Select Workload identity federation (automatic).
- Specify the following parameters:
- Subscription: Select an existing Azure subscription.
- Resource Group: Select the resource group created in the previous step. (e.g.
Maester Resource Group) Leaving this field empty will grant Contribute access to all resources in the subscription. - Service connection name: A name for this connection (e.g.
Maester Service Connection)
- Select Save to create the connection.
Grant permissions to Microsoft Graph
- Select the service connection you created in the previous step (e.g.
Maester Service Connection)- Service connections are listed under Project settings > Service connections.
- Select Manage Service Principal to open the Service Principal in the Entra portal.
- Select API permissions > Add a permission
- Select Microsoft Graph > Application permissions
- Search for each of the permissions and check the box next to each permission:
- AuditLog.Read.All
- DeviceManagementConfiguration.Read.All
- DeviceManagementManagedDevices.Read.All
- DeviceManagementRBAC.Read.All
- DeviceManagementServiceConfig.Read.All
- Directory.Read.All
- DirectoryRecommendations.Read.All
- EntitlementManagement.Read.All
- IdentityRiskEvent.Read.All
- NetworkAccess.Read.All
- OnPremDirectorySynchronization.Read.All
- OrgSettings-AppsAndServices.Read.All
- OrgSettings-Forms.Read.All
- Policy.Read.All
- Policy.Read.ConditionalAccess
- Reports.Read.All
- ReportSettings.Read.All
- RoleEligibilitySchedule.Read.Directory
- RoleManagement.Read.All
- RoleManagementAlert.Read.Directory
- SecurityIdentitiesSensors.Read.All
- SecurityIdentitiesHealth.Read.All
- SharePointTenantSettings.Read.All
- ThreatHunting.Read.All
- UserAuthenticationMethod.Read.All
To run preview Agent ID tests, also grant these application permissions:
- AgentIdentity.Read.All
- AgentIdentityBlueprint.Read.All
- AgentIdentityBlueprintPrincipal.Read.All
- Application.Read.All
- Optionally, search for each of the permissions if you want to allow privileged permissions:
- ReportSettings.ReadWrite.All
- Required to disable report obfuscation
- ReportSettings.ReadWrite.All
- Select Add permissions
- Select Grant admin consent for [your organization]
- Select Yes to confirm
Create Azure Pipeline
- Open your Azure DevOps project
- Select Pipelines > New pipeline
- Select Azure Repos Git as the location of your code
- Select the repository you created earlier
- Select Starter pipeline
- Replace the content of the
azure-pipelines.ymlfile with the code below - Verify the
azureSubscriptionvalue is set to the service connection you created in the previous step (e.g.Maester Service Connection) - Select Validate and save > Save
- Select Run to run the pipeline
- Select Job to view the test results
- Microsoft-hosted agent
- Virtual Machine Scale Set (VMSS) hosted agent
# Maester Daily Tests

trigger:
  - main

schedules:
  - cron: "0 0 * * *"
    displayName: Daily midnight build
    branches:
      include:
        - main

pool:
  vmImage: ubuntu-latest

steps:
  - task: AzurePowerShell@5
    displayName: "Run Maester"
    inputs:
      azureSubscription: "Maester Service Connection"
      pwsh: true
      azurePowerShellVersion: LatestVersion
      ScriptType: InlineScript
      Inline: |
        # Connect to Microsoft Graph
        $accessToken = (Get-AzAccessToken -ResourceTypeName MSGraph).Token
        Connect-MgGraph $accessToken

        # Install Maester
        Install-Module Maester -Force

        # Configure test results (Maester writes the NUnit XML file, Pester is not required)
        $PesterConfiguration = @{
          TestResult = @{
            Enabled      = $true
            OutputPath   = '$(System.DefaultWorkingDirectory)/test-results/test-results.xml'
            OutputFormat = 'NUnitXml'
          }
        }

        # Run Maester tests: the built-in tests run from the module, -Path adds any custom tests and maester-config.json in the repository
        Invoke-Maester -Path '$(System.DefaultWorkingDirectory)' -PesterConfiguration $PesterConfiguration -OutputFolder '$(System.DefaultWorkingDirectory)/test-results'
  - publish: $(System.DefaultWorkingDirectory)/test-results
    displayName: Publish Maester Html Report
    artifact: TestResults
  - task: PublishTestResults@2
    displayName: Publish Maester Test Results
    inputs:
      testResultsFormat: "NUnit"
      testResultsFiles: "**/test-results.xml"
      failTaskOnFailedTests: true
# Maester Daily Tests

trigger:
  - main

schedules:
  - cron: "0 0 * * *"
    displayName: Daily midnight build
    branches:
      include:
        - main

pool:
  name: Maester-DevOps

jobs:
  - job: InstallPowerShell
    displayName: "Running Maester on VMSS"
    steps:
      - script: |
          # Update package list and install pre-requisites
          sudo apt-get update
          sudo apt-get install -y wget apt-transport-https software-properties-common

          # Import the public repository GPG keys
          wget -q https://packages.microsoft.com/config/ubuntu/20.04/packages-microsoft-prod.deb
          sudo dpkg -i packages-microsoft-prod.deb

          # Update the list of products
          sudo apt-get update

          # Enable the "universe" repositories
          sudo add-apt-repository universe

          # Install PowerShell
          sudo apt-get install -y powershell

          # Verify installation
          pwsh -v

          # Install Az and Microsoft Graph PowerShell
          sudo /usr/bin/pwsh -Command 'Find-Module -Name Az -RequiredVersion '12.0.0' -Repository 'PSGallery' | Save-Module -Path '/usr/share/az_12.0.0' -Force -Verbose'
          sudo /usr/bin/pwsh -Command 'Find-Module -Name Microsoft.Graph -RequiredVersion '2.19.0' -Repository 'PSGallery' | Save-Module -Path '/usr/share/microsoft.graph_2.19.0' -Force -Verbose'

        displayName: "Install PowerShell"
      - script: |
          echo "PowerShell installed successfully"
        displayName: "Verify Installation"
      - task: AzurePowerShell@5
        displayName: "Run Maester"
        inputs:
          azureSubscription: "Maester Service Connection"
          pwsh: true
          azurePowerShellVersion: OtherVersion
          preferredAzurePowerShellVersion: "12.0.0"
          ScriptType: InlineScript
          Inline: |
            # Load Modules
            import-module /usr/share/az_12.0.0/Az.Accounts
            import-module /usr/share/microsoft.graph_2.19.0/Microsoft.Graph.Authentication

            # Connect to Microsoft Graph
            $accessToken = (Get-AzAccessToken -ResourceTypeName MSGraph).Token
            Connect-MgGraph $accessToken

            # Install Maester
            Install-Module Maester -Force

            # Configure test results (Maester writes the NUnit XML file, Pester is not required)
            $PesterConfiguration = @{
              TestResult = @{
                Enabled      = $true
                OutputPath   = '$(System.DefaultWorkingDirectory)/test-results/test-results.xml'
                OutputFormat = 'NUnitXml'
              }
            }

            # Run Maester tests: the built-in tests run from the module, -Path adds any custom tests and maester-config.json in the repository
            Invoke-Maester -Path '$(System.DefaultWorkingDirectory)' -PesterConfiguration $PesterConfiguration -OutputFolder '$(System.DefaultWorkingDirectory)/test-results'
      - publish: $(System.DefaultWorkingDirectory)/test-results
        displayName: Publish Maester Html Report
        artifact: TestResults
      - task: PublishTestResults@2
        displayName: Publish Maester Test Results
        inputs:
          testResultsFormat: "NUnit"
          testResultsFiles: "**/test-results.xml"
          failTaskOnFailedTests: true
Client secret authentication is not recommended for long-term automation, and we recommend using workload identity federation when possible. Client secrets expire, require manual rotation and manual updates in your pipeline/repository variables.
Create an Entra Application
- Open Entra admin center > Identity > Applications > App registrations
- Tip: enappreg.cmd.ms is a shortcut to the App registrations page.
- Select New registration
- Enter a name for the application (e.g.
Maester DevOps Account) - Select Register
Grant permissions to Microsoft Graph
- Open the application you created in the previous step
- Select API permissions > Add a permission
- Select Microsoft Graph > Application permissions
- Search for each of the permissions and check the box next to each permission:
- AuditLog.Read.All
- DeviceManagementConfiguration.Read.All
- DeviceManagementManagedDevices.Read.All
- DeviceManagementRBAC.Read.All
- DeviceManagementServiceConfig.Read.All
- Directory.Read.All
- DirectoryRecommendations.Read.All
- EntitlementManagement.Read.All
- IdentityRiskEvent.Read.All
- NetworkAccess.Read.All
- OnPremDirectorySynchronization.Read.All
- OrgSettings-AppsAndServices.Read.All
- OrgSettings-Forms.Read.All
- Policy.Read.All
- Policy.Read.ConditionalAccess
- Reports.Read.All
- ReportSettings.Read.All
- RoleEligibilitySchedule.Read.Directory
- RoleManagement.Read.All
- RoleManagementAlert.Read.Directory
- SecurityIdentitiesSensors.Read.All
- SecurityIdentitiesHealth.Read.All
- SharePointTenantSettings.Read.All
- ThreatHunting.Read.All
- UserAuthenticationMethod.Read.All
To run preview Agent ID tests, also grant these application permissions:
- AgentIdentity.Read.All
- AgentIdentityBlueprint.Read.All
- AgentIdentityBlueprintPrincipal.Read.All
- Application.Read.All
- Optionally, search for each of the permissions if you want to allow privileged permissions:
- ReportSettings.ReadWrite.All
- Required to disable report obfuscation
- ReportSettings.ReadWrite.All
- Select Add permissions
- Select Grant admin consent for [your organization]
- Select Yes to confirm
(Optional) Grant permissions to Exchange Online
(Optional) Grant permissions to Exchange Online
The Exchange Online role-based access control (RBAC) implementation uses service-specific roles for applications. The configuration below establishes the authorization chain for the app registration you created in the previous steps.
The Exchange Online permissions are necessary to support tests that validate Exchange Online configurations, such as the CISA tests.
- Open the application you created in the previous step
- Select API permissions > Add a permission
- Select APIs that my organization uses > search for Office 365 Exchange Online > Application permissions
- Search for
Exchange.ManageAsApp - Select Add permissions
- Select Grant admin consent for [your organization]
- Select Yes to confirm
- Connect to the Exchange Online Management tools and use the following to set the appropriate permissions:
New-ServicePrincipal -AppId <Application ID> -ObjectId <Object ID> -DisplayName <Name>
New-ManagementRoleAssignment -Role "View-Only Configuration" -App <DisplayName from previous command>
(Optional) Grant permissions to Teams
(Optional) Grant permissions to Teams
The Teams role-based access control (RBAC) implementation uses service-specific roles for applications. The configuration below establishes the authorization chain for the app registration you created in the previous steps.
The Teams permissions are necessary to support tests that validate Teams configurations.
- Open Roles and administrators
- Search and select Teams Reader
- Select Add assigment
- Select No member selected
- Search for the name of previously created application
- Select previously created application and select Select to confirm
- Select Next to confirm
- Ensure that Active and Permanently assigned are ticked
- Enter Justification
- Select Assign to confirm
(Optional) Grant permissions to Azure
(Optional) Grant permissions to Azure
The Azure Role-Based Access Control (RBAC) implementation uses Uniform Resource Names (URNs) with a "/" separator for hierarchical scoping. Some resources exist within the root (e.g., "/") scope, and Microsoft retains strict control over them by limiting supported interactions. As a Global Administrator, you can elevate access to become authorized for these limited interactions.
The Azure RBAC permissions are necessary to support tests that validate Azure configurations, such as the CISA tests.
The following PowerShell script will enable you, with a Global Administrator role assignment, to:
- Identify the Service Principal Object ID that will be authorized as a Reader (Enterprise app Object ID)
- Install the necessary Az module and prompt for connection
- Elevate your account access to the root scope
- Create a role assignment for Reader access over the Root Scope
- Create a role assignment for Reader access over the Entra ID (i.e., aadiam provider)
- Identify the role assignment authorizing your account access to the root scope
- Delete the root scope role assignment for your account
$servicePrincipal = "<Object ID of the Entra App>"
$subscription = "<Subscription ID>"
Install-Module Az.Accounts -Force
Install-Module Az.Resources -Force
Connect-AzAccount
#Elevate to root scope access
$elevateAccess = Invoke-AzRestMethod -Path "/providers/Microsoft.Authorization/elevateAccess?api-version=2015-07-01" -Method POST

#Assign permissions to Enterprise App
New-AzRoleAssignment -ObjectId $servicePrincipal -Scope "/" -RoleDefinitionName "Reader" -ObjectType "ServicePrincipal"
New-AzRoleAssignment -ObjectId $servicePrincipal -Scope "/providers/Microsoft.aadiam" -RoleDefinitionName "Reader" -ObjectType "ServicePrincipal"

#Remove root scope access
$assignment = Get-AzRoleAssignment -RoleDefinitionId 18d7d88d-d35e-4fb5-a5c3-7773c20a72d9|?{$_.Scope -eq "/" -and $_.SignInName -eq (Get-AzContext).Account.Id}
$deleteAssignment = Invoke-AzRestMethod -Path "$($assignment.RoleAssignmentId)?api-version=2018-07-01" -Method DELETE
(Optional) Grant permissions to SharePoint Online
(Optional) Grant permissions to SharePoint Online
SharePoint Online tests require the PnP.PowerShell module and an Entra ID app registration configured for interactive login with SharePoint delegated permissions.
The SharePoint Online permissions are necessary to support tests that validate SharePoint Online configurations, such as the CISA SharePoint baseline controls.
Install PnP.PowerShell
Install-Module PnP.PowerShell -Scope CurrentUser
The easiest way to create the required app registration is to follow the official PnP PowerShell guide:
Option A — Automatically create a new PnP app registration
PnP provides a built-in cmdlet to create a dedicated app registration for interactive login. This is the quickest option and the one recommended in the PnP docs:
Register-PnPEntraIDAppForInteractiveLogin -ApplicationName "Maester PnP" -Tenant [yourtenant].onmicrosoft.com -SharePointDelegatePermissions "AllSites.FullControl"
This will:
- Create an Entra ID app registration with the required delegated permissions
- Configure
http://localhostas the redirect URI automatically - Prompt you to authenticate and provide consent
- Output the Client ID you will need for
Connect-Maester
If you prefer to start from the exact example in the PnP docs, run Register-PnPEntraIDAppForInteractiveLogin with their default parameters and add -SharePointDelegatePermissions "AllSites.FullControl" for Maester's SharePoint tests.
Note: Maester's SharePoint tests are read-only.
AllSites.FullControl(delegated) is sufficient.Important: After registering the app, open a new PowerShell session before running
Connect-Maester, as the registration process loads PnP assemblies that can conflict with Microsoft Graph.
Option B — Reuse the existing Maester app registration
If you prefer not to create a separate app, you can update the Maester app registration you created earlier to also support PnP PowerShell interactive login.
1. Add the localhost redirect URI
- Open your Maester app registration in the Entra admin center
- Select Authentication > Add a platform > Mobile and desktop applications
- In the Custom redirect URIs field, enter
http://localhost(note:http, nothttps) - Select Configure
2. Add SharePoint delegated permissions
- Select API permissions > Add a permission
- Select SharePoint > Delegated permissions
- Search for and check
AllSites.FullControl - Select Add permissions
- Select Grant admin consent for [your organization] and confirm
3. Connect using the existing Client ID
You can retrieve the Client ID of your Maester app from Graph without looking it up manually. First connect to Graph, then query for the app by its display name:
# Connect to Graph first
Connect-Maester -Service Graph

# Retrieve the Client ID of the Maester app registration
$clientId = (Get-MgApplication -Filter "displayName eq 'Maester DevOps Account'").AppId
Then connect to SharePoint Online in a new session using the retrieved Client ID. The SharePoint admin URL is auto-discovered from your tenant — no need to specify it manually:
# Open a new PowerShell session, then:
Connect-Maester -Service Graph,SharePointOnline -SharePointClientId $clientId
Important: After registering the app, open a new PowerShell session before running
Connect-Maester, as PnP assemblies loaded during the session can conflict with Microsoft Graph.
Option C — App-only access (automation / non-interactive)
For unattended runs (CI pipelines, scheduled tasks) where interactive login is not possible, use application permissions with certificate-based authentication.
1. Add SharePoint application permission
- Open your app registration in the Entra admin center
- Select API permissions > Add a permission
- Select SharePoint > Application permissions
- Search for and check
Sites.FullControl.All - Select Add permissions
- Select Grant admin consent for [your organization] and confirm
2. Upload a certificate
- Select Certificates & secrets > Certificates > Upload certificate
- Upload the public key (
.cer) of your certificate
3. Connect using Connect-Maester
Pass the certificate thumbprint directly to Connect-Maester using -SharePointCertificateThumbprint. -TenantId is required for thumbprint-based auth:
$params = @{
  Service = @('Graph', 'SharePointOnline')
  SharePointClientId = "<App Client ID>"
  SharePointCertificateThumbprint = "<Certificate Thumbprint>"
  TenantId = "<Tenant ID or domain>"
}
Connect-Maester @params
The certificate must be present in the current user's Windows certificate store. The SharePoint admin URL is auto-discovered — supply -SharePointAdminUrl to override it if needed.
Use the Client ID from Option A or Option B when connecting:
Connect-Maester -Service Graph,SharePointOnline -SharePointClientId "<Client ID>"
The SharePoint admin URL is auto-discovered from your tenant's initial domain. If auto-discovery does not work (e.g. government or custom-domain tenants), supply it explicitly:
Connect-Maester -Service Graph,SharePointOnline -SharePointClientId "<Client ID>" -SharePointAdminUrl "https://contoso-admin.sharepoint.com"
For device code flow (e.g. non-interactive sessions):
Connect-Maester -Service Graph,SharePointOnline -SharePointClientId "<Client ID>" -UseDeviceCode
(Optional) Grant Dataverse permissions for Copilot Studio tests
(Optional) Grant Dataverse permissions for Copilot Studio
Dataverse access is required for the Copilot Studio security tests (MT.1113–MT.1122) that evaluate Copilot Studio agent configurations.
Create an Application User in Power Platform
- Go to the Power Platform Admin Center → select your environment → Settings → Users + permissions → Application users
- Click New app user → Add an app → select the app registration created above
- Select the correct Business unit
- Assign a security role with read access:
- Basic User for simplicity, or
- A custom role (e.g.
Maester Security Reader) with Organization-level Read on: Agent (bot), Agent component (botcomponent), User (systemuser), and Connection Reference (connectionreference)
- Click Create
Configure Maester
Add the environment URL to maester-config.json:
{
  "GlobalSettings": {
    "DataverseEnvironmentUrl": "https://org12345.crm.dynamics.com"
  }
}
Create a client secret
Client secret authentication is not recommended for long-term automation, and we recommend using workload identity federation when possible. Client secrets expire, require manual rotation and manual updates in your pipeline/repository variables.
- Select Certificates & secrets > Client secrets > New client secret
- Enter a description for the secret (e.g.
Maester DevOps Secret) - Select Add
- Copy the value of the secret, we will use this value in the Azure Pipeline
Create Azure Pipeline
- Open your Azure DevOps project
- Select Pipelines > New pipeline
- Select Azure Repos Git as the location of your code
- Select the repository you created earlier
- Select Starter pipeline
- Select Variable to open the variables editor and add the following variables.
- In the Entra portal, open the application you created earlier and copy the following values from the Overview page:
- Name: TENANTID, Value: The Directory (tenant) ID of the Entra tenant
- Name: CLIENTID, Value: The Application (client) ID of the Entra application you created
- Name: CLIENTSECRET, Value: The client secret you copied in the previous step
- Important: Tick the Keep this value secret checkbox
- Replace the content of the
azure-pipelines.ymlfile with the code below - Select Validate and save > Save
- Select Run to run the pipeline
- Select Job to view the test results
- Microsoft-hosted agent
- Azure Virtual Machine Scale Set hosted agent
# Maester Daily Tests

trigger:
  - main

schedules:
  - cron: "0 0 * * *"
    displayName: Daily midnight build
    branches:
      include:
        - main

pool:
  vmImage: ubuntu-latest

steps:
  - pwsh: |
      # Connect to Microsoft Graph
      $clientSecret = ConvertTo-SecureString -AsPlainText $env:PS_ClientSecret -Force
      [pscredential]$clientSecretCredential = New-Object System.Management.Automation.PSCredential($env:CLIENTID, $clientSecret)
      Connect-MgGraph -TenantId $env:TENANTID -ClientSecretCredential $clientSecretCredential

      # Install Maester
      Install-Module Maester -Force

      # Configure test results (Maester writes the NUnit XML file, Pester is not required)
      $PesterConfiguration = @{
        TestResult = @{
          Enabled      = $true
          OutputPath   = '$(System.DefaultWorkingDirectory)/test-results/test-results.xml'
          OutputFormat = 'NUnitXml'
        }
      }

      # Run Maester tests: the built-in tests run from the module, -Path adds any custom tests and maester-config.json in the repository
      Invoke-Maester -Path '$(System.DefaultWorkingDirectory)' -PesterConfiguration $PesterConfiguration -OutputFolder '$(System.DefaultWorkingDirectory)/test-results'
    env:
      PS_ClientSecret: $(CLIENTSECRET)
    continueOnError: true
    displayName: Run Maester Tests
  - publish: $(System.DefaultWorkingDirectory)/test-results
    artifact: TestResults
    displayName: Publish Maester Html Report
  - task: PublishTestResults@2
    inputs:
      testResultsFormat: "NUnit"
      testResultsFiles: "**/test-results.xml"
    displayName: Publish Maester Test Results
# Maester Daily Tests

trigger:
  - main

schedules:
  - cron: "0 0 * * *"
    displayName: Daily midnight build
    branches:
      include:
        - main

pool:
  name: Maester-DevOps

jobs:
  - job: InstallPowerShell
    displayName: "Running Maester on VMSS"
    steps:
      - script: |
          # Update package list and install pre-requisites
          sudo apt-get update
          sudo apt-get install -y wget apt-transport-https software-properties-common

          # Import the public repository GPG keys
          wget -q https://packages.microsoft.com/config/ubuntu/20.04/packages-microsoft-prod.deb
          sudo dpkg -i packages-microsoft-prod.deb

          # Update the list of products
          sudo apt-get update

          # Enable the "universe" repositories
          sudo add-apt-repository universe

          # Install PowerShell
          sudo apt-get install -y powershell

          # Verify installation
          pwsh -v

          # Install Az and Microsoft Graph PowerShell
          sudo /usr/bin/pwsh -Command 'Find-Module -Name Az -RequiredVersion '12.0.0' -Repository 'PSGallery' | Save-Module -Path '/usr/share/az_12.0.0' -Force -Verbose'
          sudo /usr/bin/pwsh -Command 'Find-Module -Name Microsoft.Graph -RequiredVersion '2.19.0' -Repository 'PSGallery' | Save-Module -Path '/usr/share/microsoft.graph_2.19.0' -Force -Verbose'

        displayName: "Install PowerShell"
      - script: |
          echo "PowerShell installed successfully"
        displayName: "Verify Installation"
      - task: AzurePowerShell@5
        displayName: "Run Maester"
        inputs:
          azureSubscription: "Maester Service Connection"
          pwsh: true
          azurePowerShellVersion: OtherVersion
          preferredAzurePowerShellVersion: "12.0.0"
          ScriptType: InlineScript
          Inline: |
            # Load Modules
            import-module /usr/share/az_12.0.0/Az.Accounts
            import-module /usr/share/microsoft.graph_2.19.0/Microsoft.Graph.Authentication

            # Connect to Microsoft Graph
            $accessToken = (Get-AzAccessToken -ResourceTypeName MSGraph).Token
            Connect-MgGraph $accessToken

            # Install Maester
            Install-Module Maester -Force

            # Configure test results (Maester writes the NUnit XML file, Pester is not required)
            $PesterConfiguration = @{
              TestResult = @{
                Enabled      = $true
                OutputPath   = '$(System.DefaultWorkingDirectory)/test-results/test-results.xml'
                OutputFormat = 'NUnitXml'
              }
            }

            # Run Maester tests: the built-in tests run from the module, -Path adds any custom tests and maester-config.json in the repository
            Invoke-Maester -Path '$(System.DefaultWorkingDirectory)' -PesterConfiguration $PesterConfiguration -OutputFolder '$(System.DefaultWorkingDirectory)/test-results'
      - publish: $(System.DefaultWorkingDirectory)/test-results
        displayName: Publish Maester Html Report
        artifact: TestResults
      - task: PublishTestResults@2
        displayName: Publish Maester Test Results
        inputs:
          testResultsFormat: "NUnit"
          testResultsFiles: "**/test-results.xml"
          failTaskOnFailedTests: true
Step-by-step video tutorial
Viewing test results
- Select Pipelines > Runs to view the status of the pipeline
- Select on a run to view the test results
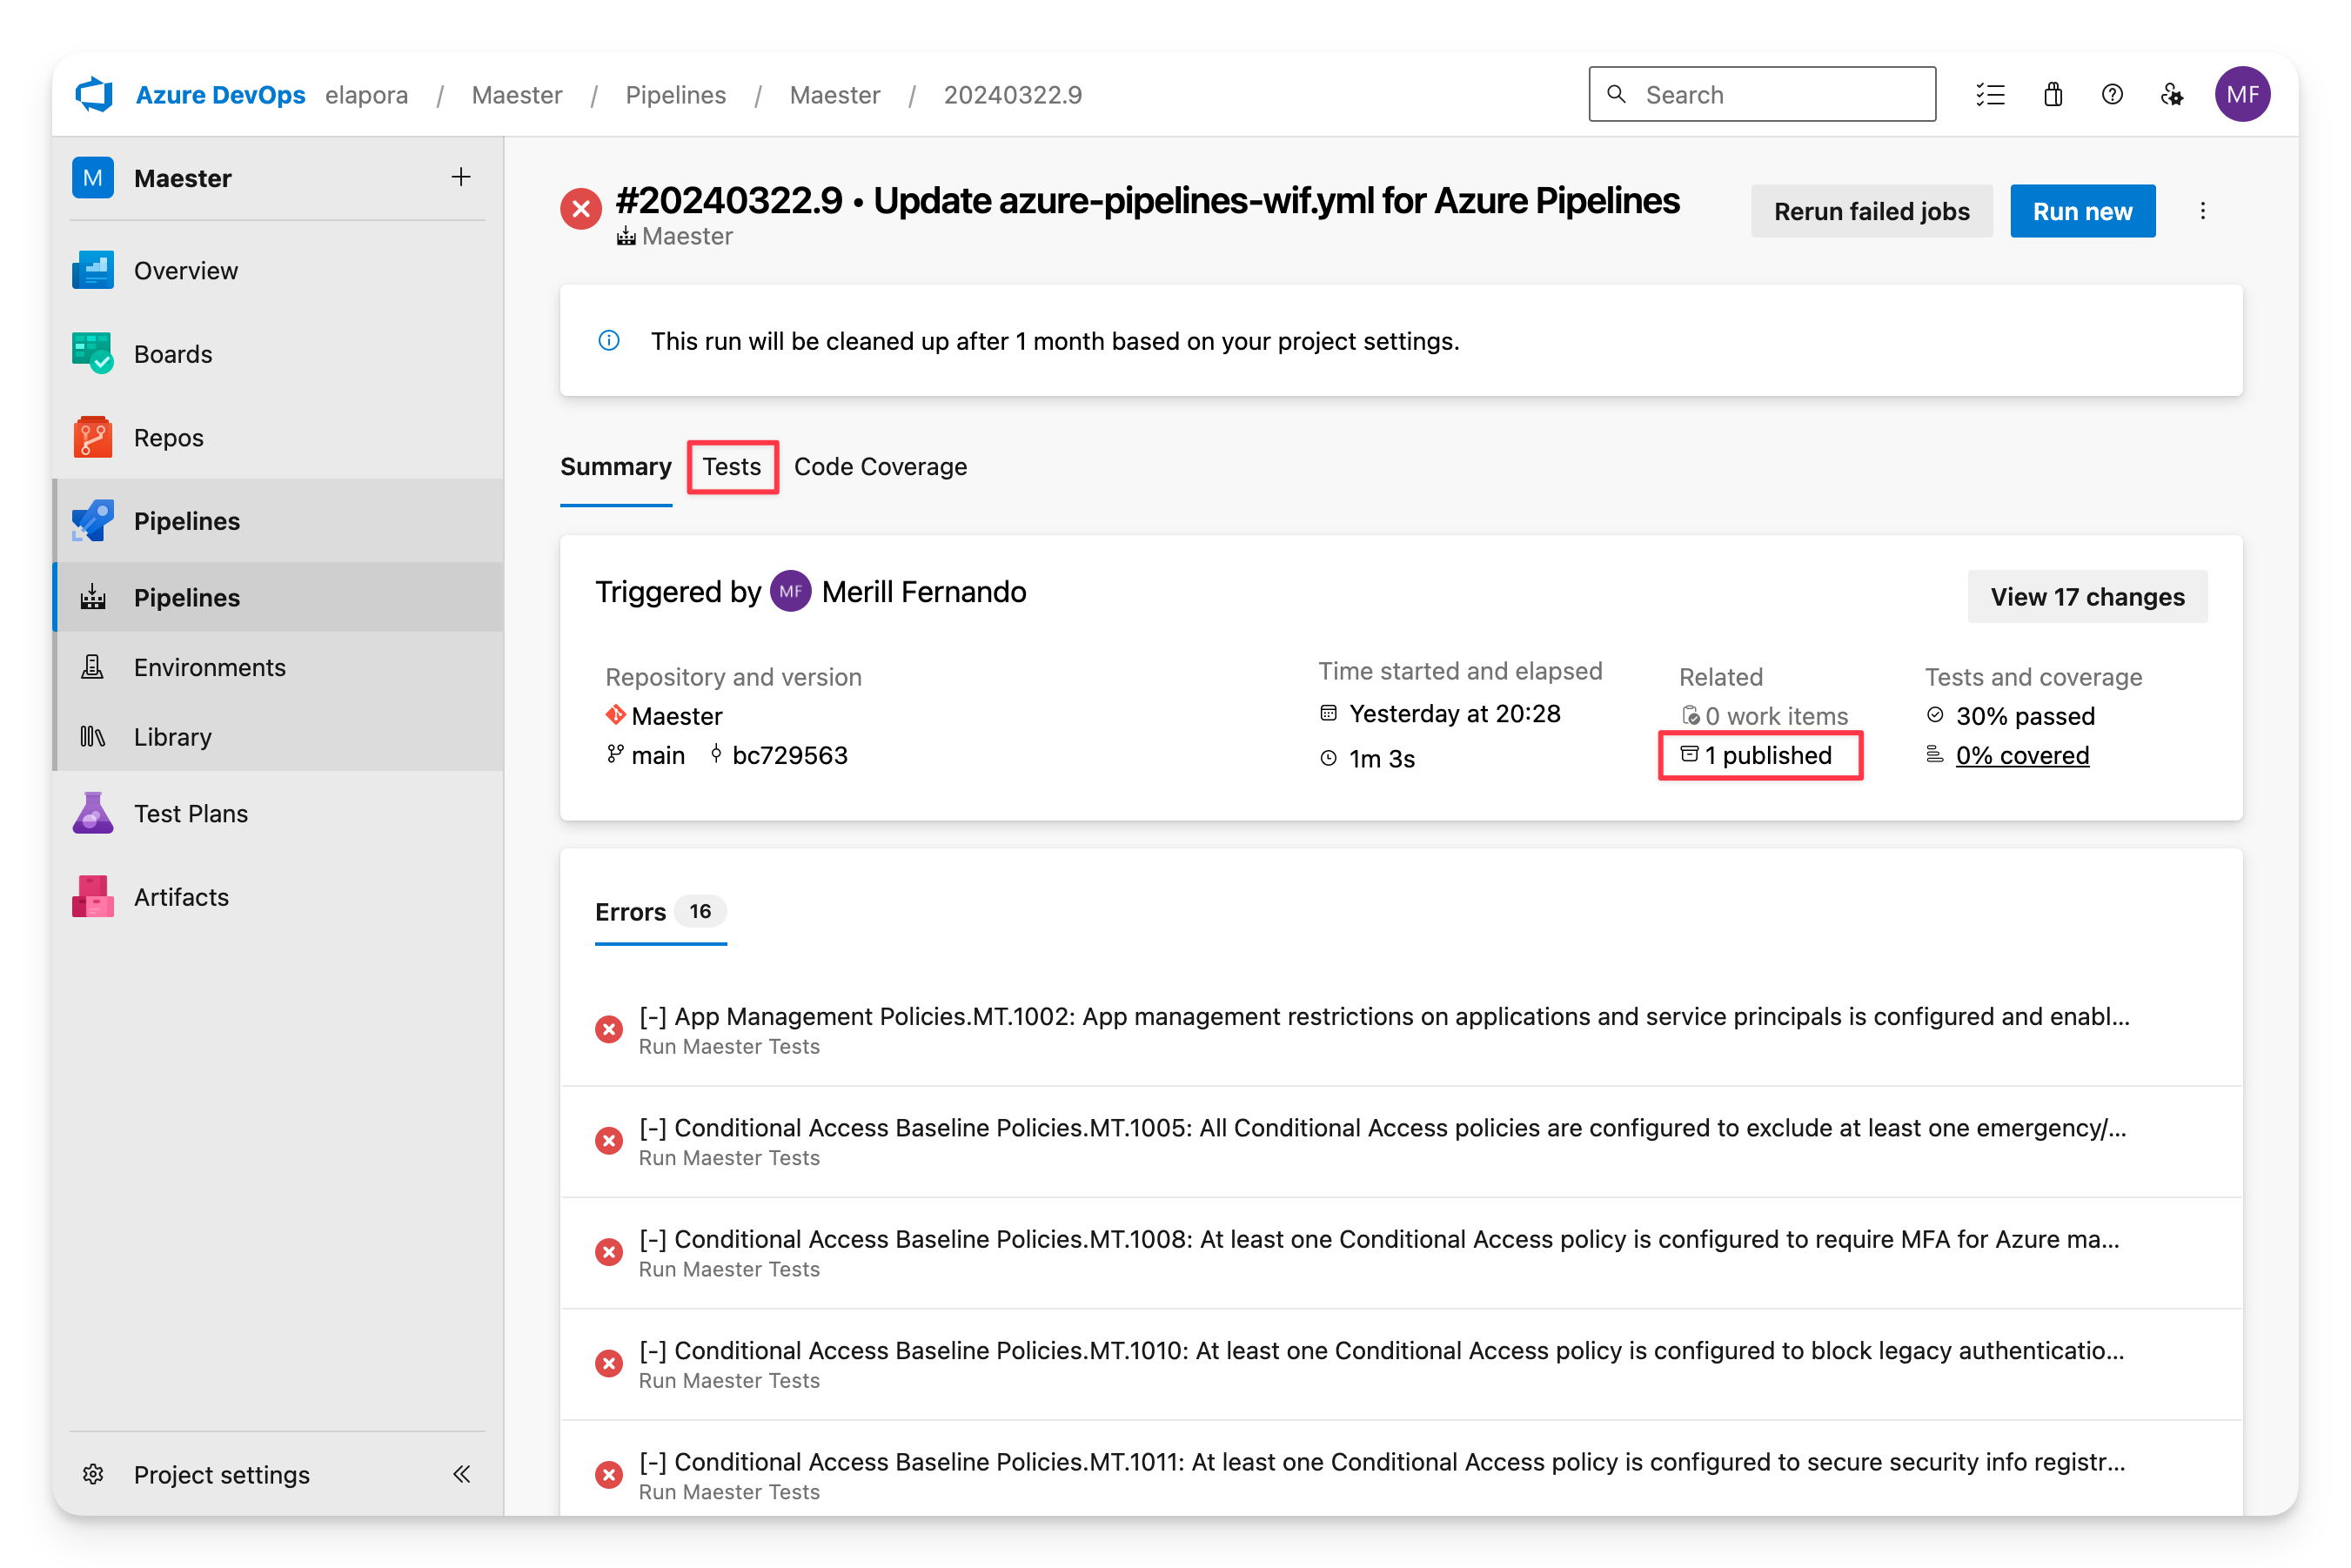
Summary view
The summary view shows the status of the pipeline run, the duration, and the number of tests that passed, failed, and were skipped.
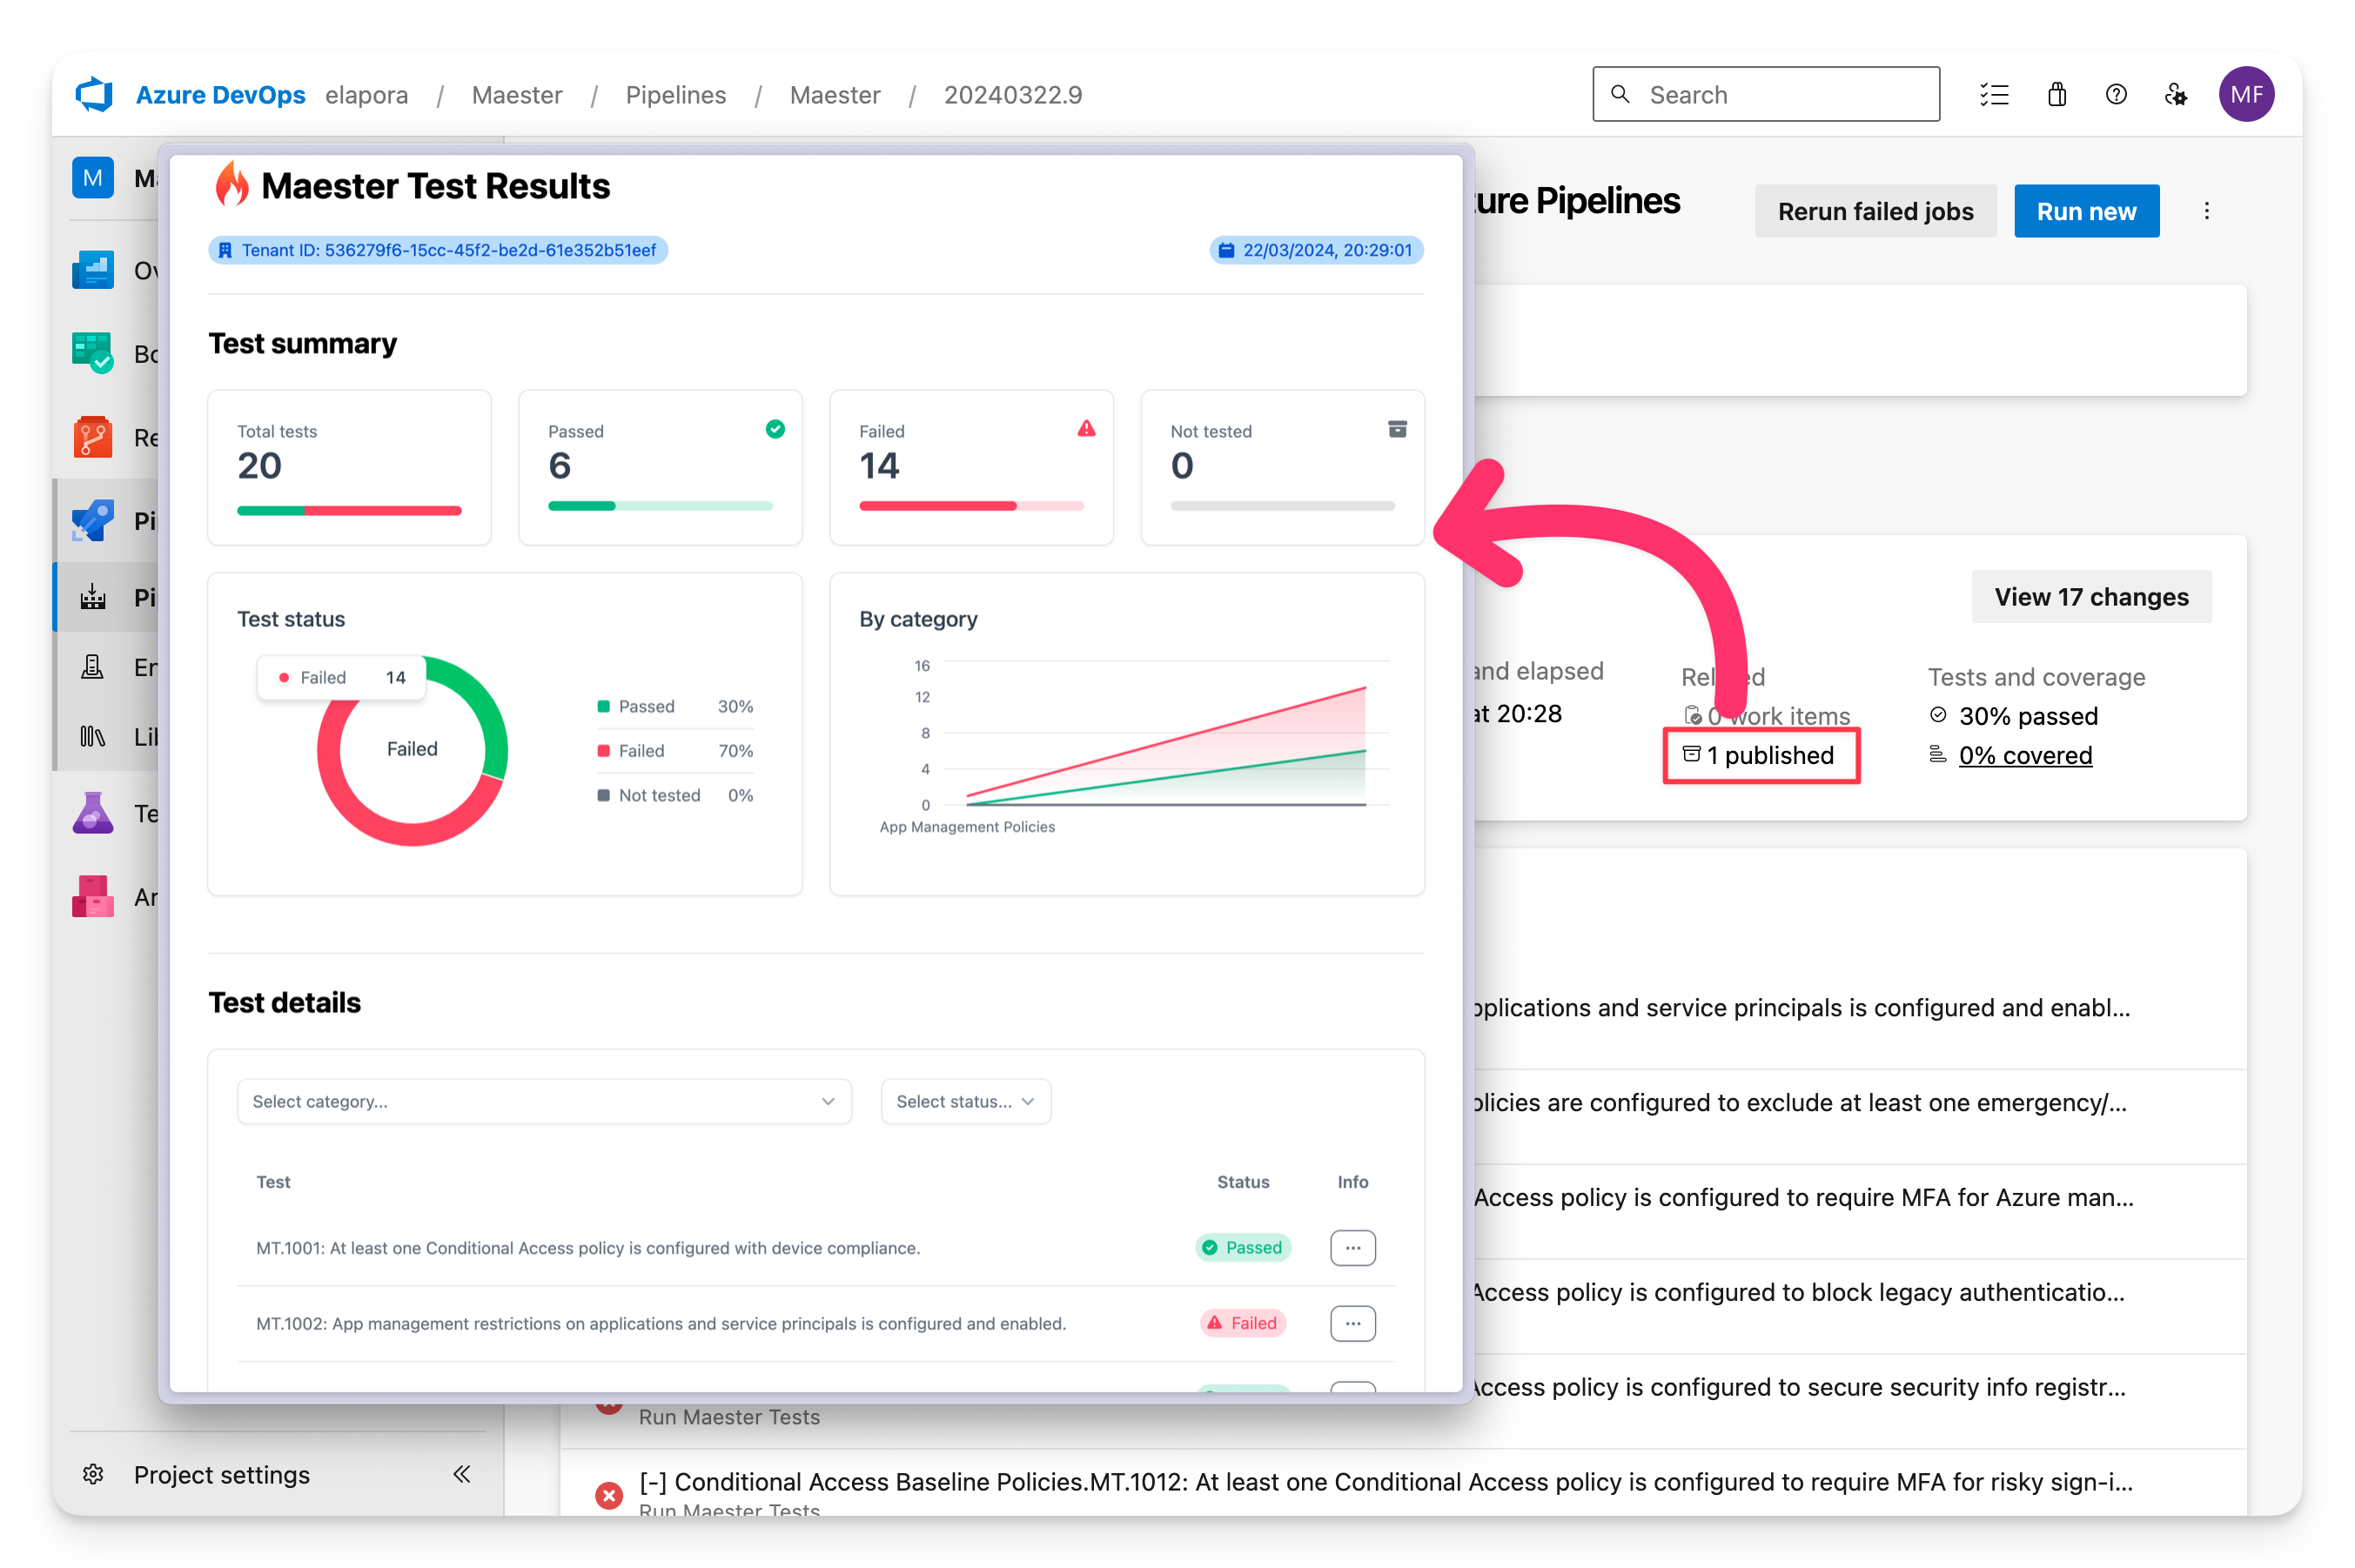
Maester report
The Maester report can be downloaded and viewed by selecting the Published artifact.
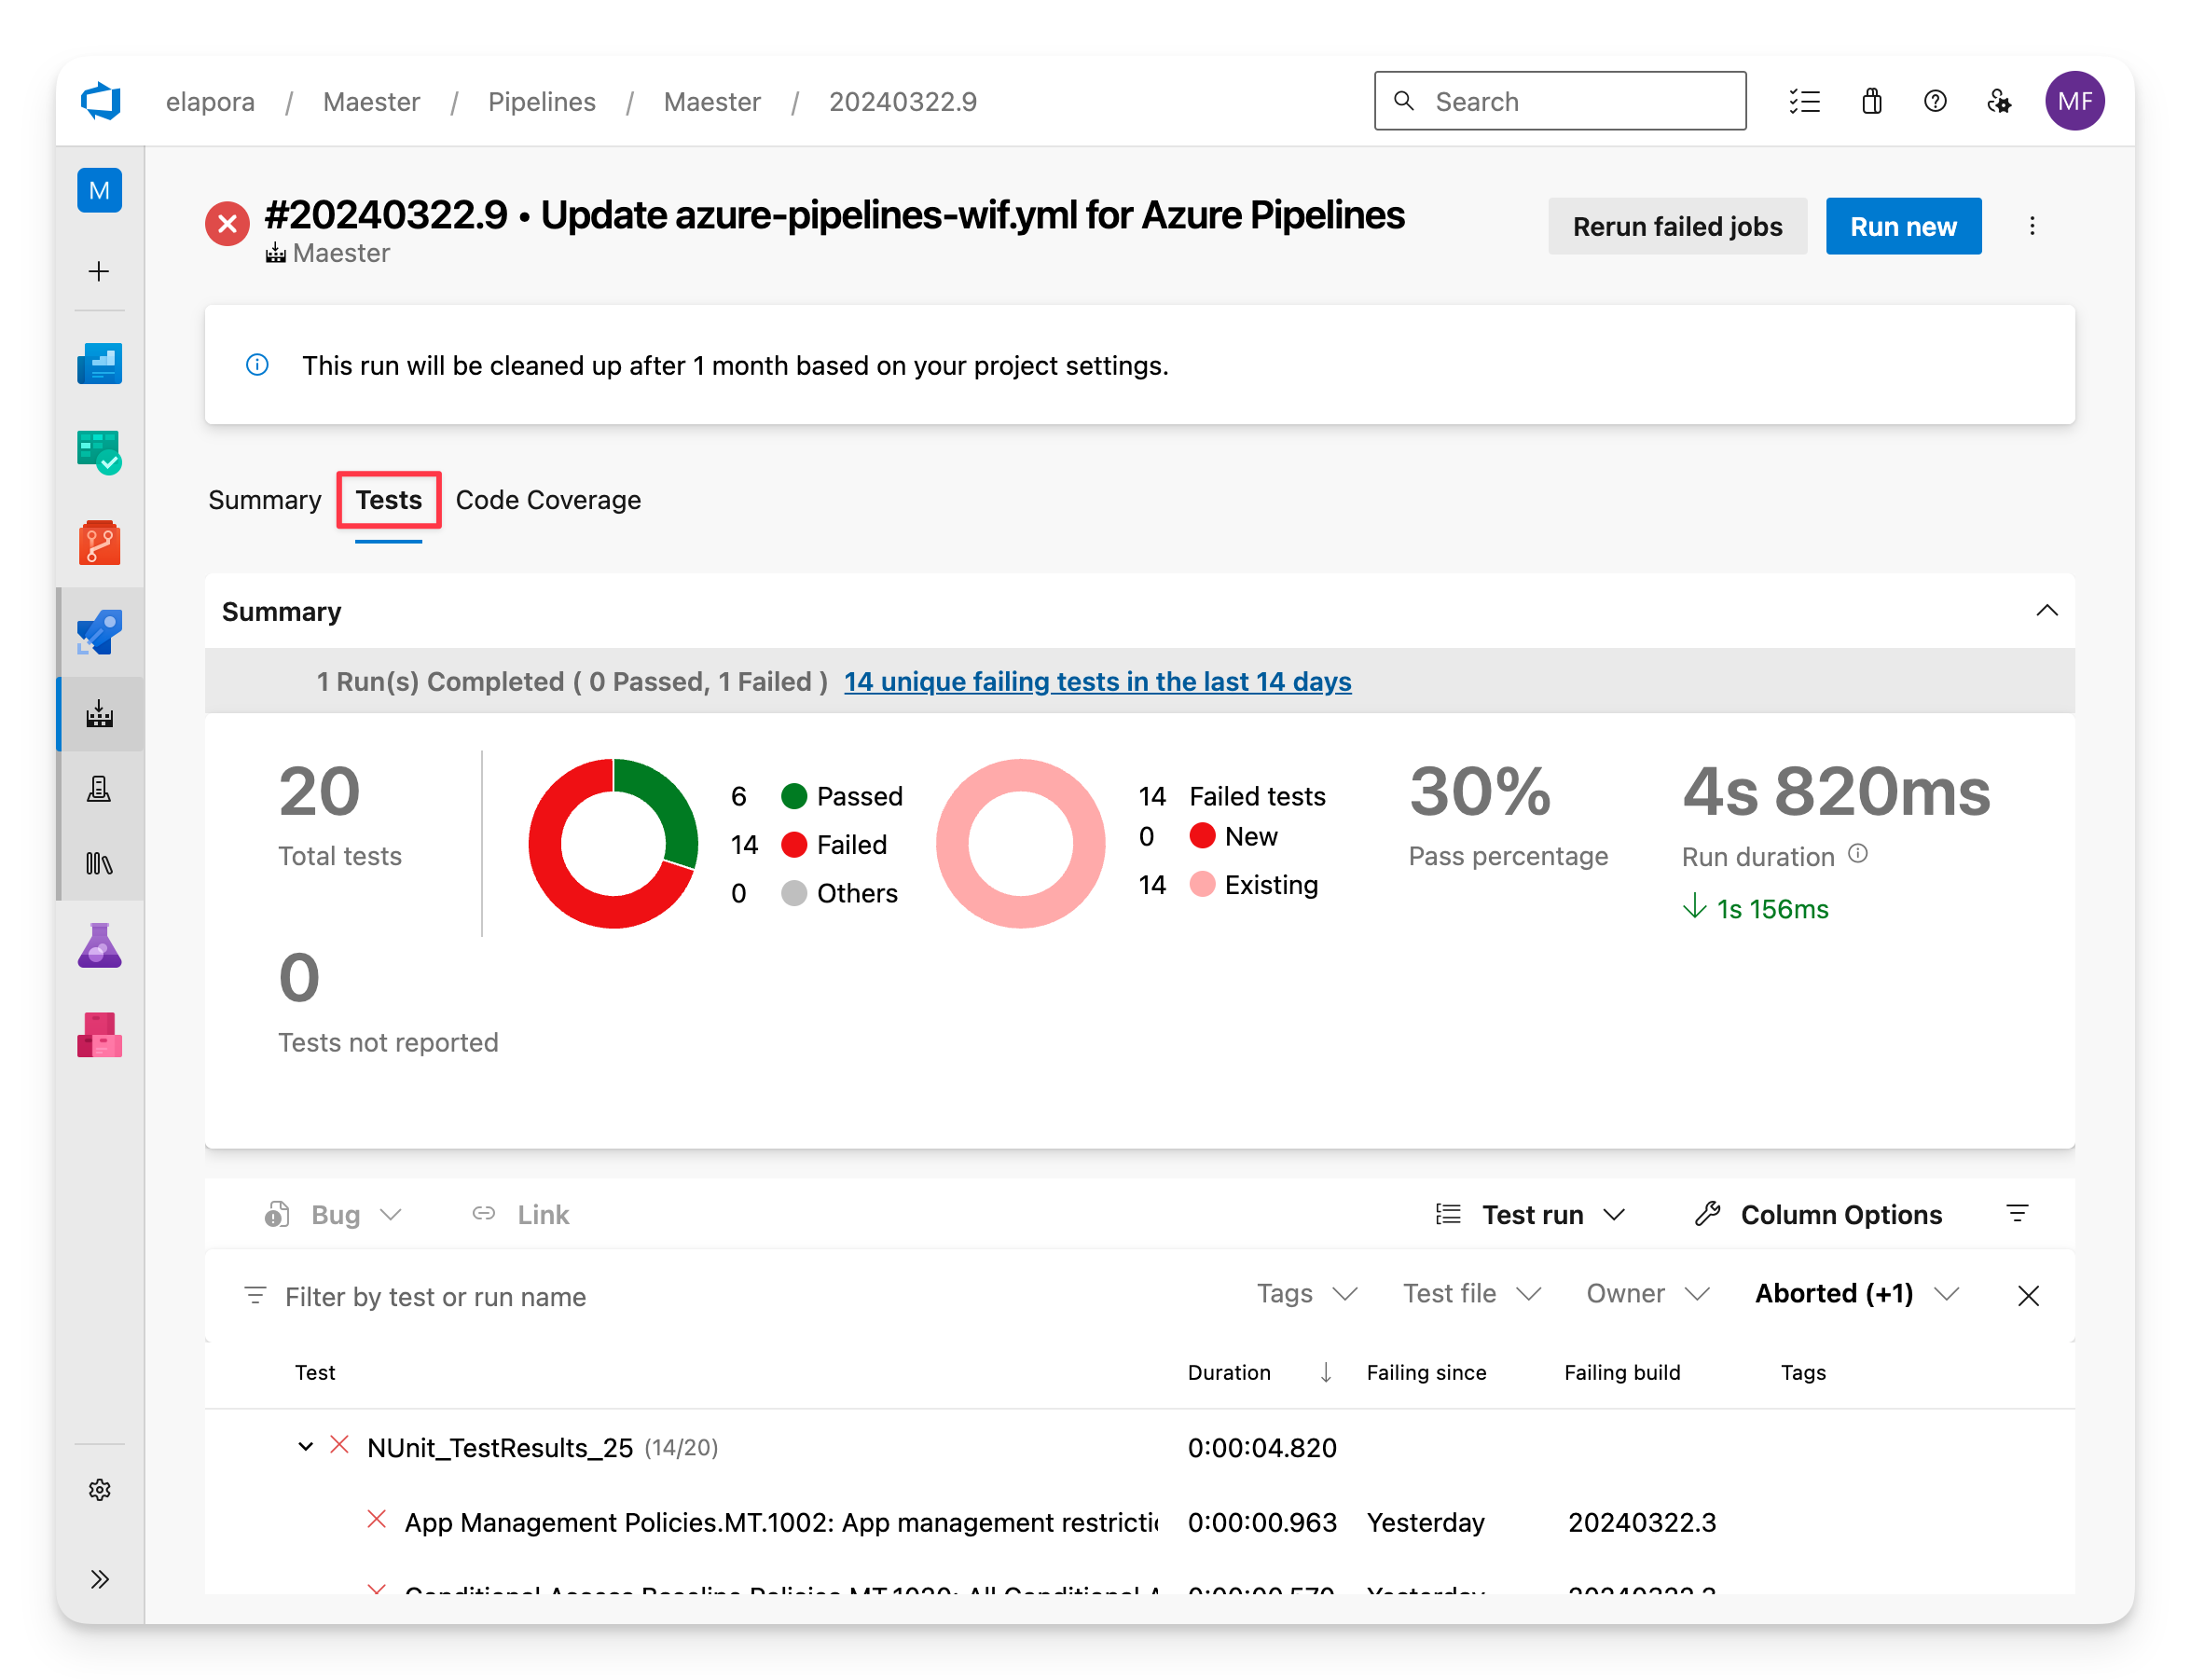
Tests view
The Tests tab shows a detailed view of each test, including the test name, duration, and status.
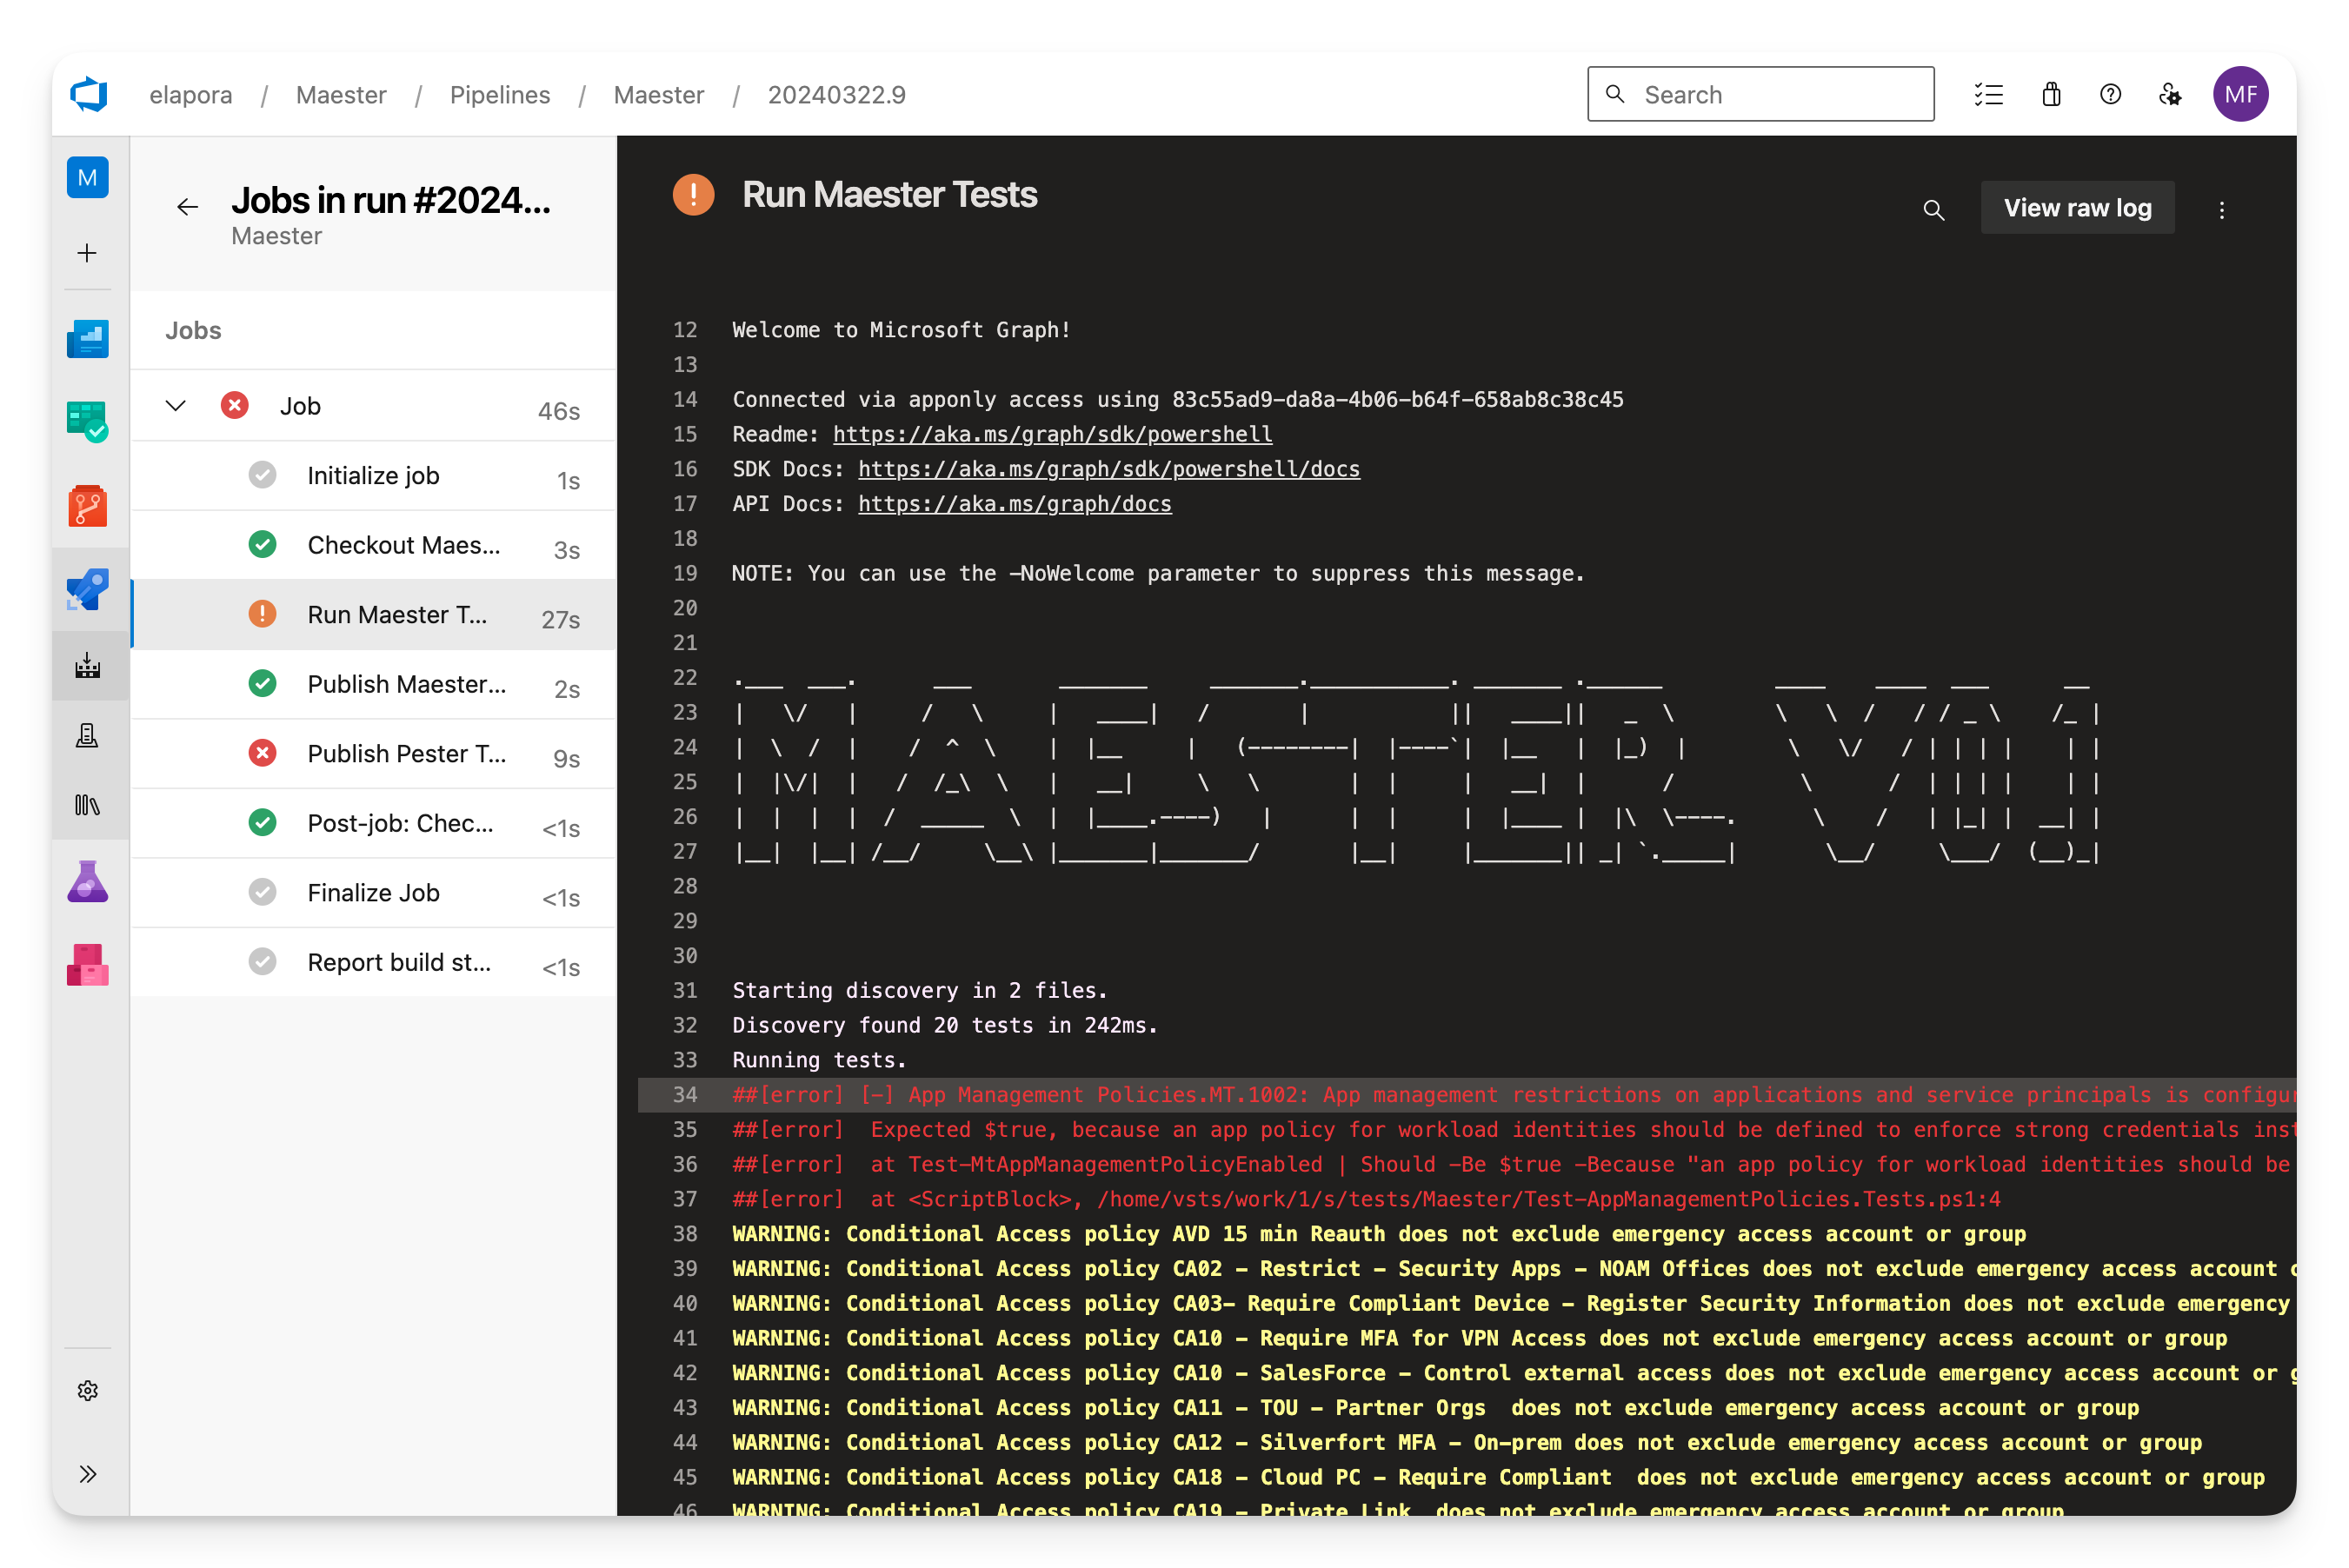
Logs view
In the Summary tab select on any of the errors to view the raw logs from Maester.
Keeping your Maester tests up to date
The Maester team adds new tests over time. The built-in tests ship inside the Maester PowerShell module, and the pipelines above run Install-Module Maester -Force, so every run uses the latest release and its tests. There is nothing to update in your repository, which only holds your own custom tests.
To control when you move to a new release, pin the version instead, for example Install-Module Maester -RequiredVersion 3.0.0 -Force, and raise it when you are ready.
If you set up this pipeline with Maester 2.x by importing the maester-tests repository, see Upgrading from 2.x. The old pipeline keeps working, but you can remove the copied test folders from your repository and keep only your Custom folder and maester-config.json.
If your custom tests include Pester-format tests (*.Tests.ps1), add Install-Module Pester -MinimumVersion 5.7.1 -Force before Invoke-Maester. Pester is not needed for the built-in tests.