Contributing
Introduction
This guide is for anyone who wants to contribute to the Maester project. Whether you want to contribute to the code, documentation, or just have an idea for a new feature, we welcome your input.
Follow the guide below to set up Maester for development on your local machine, make changes, and submit a pull request.
Repository layout
Maester has a fixed folder layout so that anyone, person or AI agent, can tell where a file belongs from what it
does. The rules below are checked by powershell/tests/general/RepositoryLayout.Tests.ps1, which runs with the
other unit tests, so a pull request that breaks them fails CI. AGENTS.md
carries the same rules for AI coding and review agents.
The rules
- Folder names are lowercase kebab-case:
tests/maester/global-secure-access,powershell/internal/services/azure-devops. This applies to every folder undertests/,powershell/andbuild/. Files keep their own conventions:Test.<ID>.ps1andTest.<ID>.mdfor checks,Verb-Noun.ps1for functions. - One name per service. A service folder has the same name wherever it appears:
ad,azure,azure-devops,copilot,copilot-studio,defender,entra,exchange,foundry,github,global-secure-access,graph,intune,purview,sharepoint,teams,xspm. Adding a service means adding it to this list and to the layout test. - A file goes in the group that matches its job, not in the suite that first needed it (see the trees below).
- Generated code lives in
generated/folders, so it is obvious from the path that it must not be edited by hand.
tests/                              The security checks: Test.<ID>.ps1 + Test.<ID>.md, plus suite.json, README.md and framework files
  <suite>/frameworks/<key>.json     The catalogue of a benchmark, one entry per requirement (cis/ and cisa/)
  maester/<service>/                MT.xxxx checks, one folder per service (plus drift/)
  maester/xspm/                     Exposure management; has its own suite.json (the nearest one applies)
  cis/                              CIS benchmark checks
  cisa/<service>/                   CISA SCuBA checks
  ad/<area>/                        Active Directory checks
  eidsca/  orca/                    Generated by build/eidsca and build/orca
  custom/                           Reserved for users' own tests; nothing is committed here

powershell/
  public/                           Exported commands, grouped by what the user is doing
    run/                            Run, list, create and convert tests (Invoke-Maester, Get-MtTest, New-MtTest, ...)
    connect/                        Connect, check the session, clear caches (Connect-Maester, Test-MtConnection, ...)
    report/                         Reports and result files (Get-MtHtmlReport, Send-MtMail, Merge-MtMaesterResult, ...)
    app/                            The Maester Entra app (New-MtMaesterApp, ...)
    services/<service>/             Data helpers that custom tests call (Get-MtUser, Get-MtExo, Invoke-MtGraphRequest, ...)
  internal/                         Not exported
    engine/                         Discovery, selection, planning and execution of tests
    session/                        Module state, configuration, versions, progress and telemetry
    connect/                        Connection checks and consent help
    report/                         Result conversion, Markdown reports, affected objects
    app/                            Helpers for the Maester Entra app
    services/<service>/             Reusable data access for one service (the GitHub client, Graph caching, ...)
    checks/<suite>/<service>/       Helpers used by the checks of one suite
    generated/eidsca/  orca/        Generated; regenerate, never edit
    utility/                        Small helpers with no domain (query strings, object properties, prompts)
  assets/  lib/  tools/             Data files, the compiled engine, developer tools
  tests/                            Unit tests of the module itself
Why this layout
- Lowercase kebab-case avoids case bugs. Windows and macOS ignore case in paths, Linux does not. Mixed case
(
Maester/Entrabesidecisa/entra) leads to code that passes locally and fails in CI on Linux, and to case-only renames that Git on Windows and macOS handles badly. All-lowercase names also match the website URLs (/docs/tests/cis/...) and the rest of the module (public,internal,assets). Prowler, the closest open source project to Maester, uses the same convention. - Suites are found by
suite.json, not by folder name, so a folder name can follow the convention without changing a suite's ID or documentation URLs. That is what letsXSPMlive inmaester/xspm. - Grouping by job, then by service, gives every file one obvious home. Before 3.0, Exchange code could be in four
places (a suite folder under
public/, a suite folder underinternal/checks/, a loose file, or a service folder). Well-run projects separate the layers the same way: ScubaGear splits connection, per-product data providers, evaluation and reporting; Prowler keeps each service's client beside that service's checks and shared code inlib/; PSFramework and dbatools split exported and internal functions, then group by feature. public/is grouped by what the user is doing, so the folder tells you which commands belong together in the command reference.- Folders name products, areas name themes. A check goes in the folder of the product whose settings it reads,
because that is what an author knows when adding a check and what an admin knows when looking for one. Themes
that cut across products, such as AI, are the
Areaattribute of a test: Copilot Studio agent checks live inmaester/copilot-studio/, an Entra agent identity check lives inmaester/entra/, and both declareArea = 'ai', soInvoke-Maester -Area airuns them together. A theme folder such asai/would end up holding checks for Copilot, Copilot Studio, Foundry, Entra Agent ID and Purview, each with its own API, portal and permissions. - Data access is shared, check logic is not. Code that reads a service (
services/) is reused by many checks and by custom tests. Code that only one suite's checks need stays inchecks/<suite>/.
Making an internal helper public
Custom tests are loaded into their own private module, so they can call only the commands Maester exports. When users need one of the internal helpers in their own tests, promote it instead of copying it:
- Move the file from
powershell/internal/services/<service>/topowershell/public/services/<service>/withgit mv, so its history follows it. - Add the function to
FunctionsToExportinpowershell/Maester.psd1. - Give it complete comment-based help: synopsis, description, every parameter, at least one example and a
.LINKtohttps://maester.dev/docs/commands/<Name>. The command reference page is generated from it. - Review the name and parameters before you merge. Once a command is exported it is public API: renaming it, removing a parameter or changing what it returns is a breaking change for users' tests.
Manifest.Tests.ps1 fails if a file in public/ is not exported or an internal function is, and Help.Tests.ps1
fails if an exported command's help is incomplete, so a half-finished promotion does not pass CI. Helpers that
belong to one suite's checks (internal/checks/) are not candidates: move the reusable part into
services/<service>/ first.
Maester PowerShell module dev guide
Build and load Maester locally
After changing files under ./powershell or ./tests, run the following command
from the repository root:
./build/Build-LocalMaester.ps1
This command:
- Builds the consolidated, publishable module in
./module. - Generates the companion test metadata used by reports.
- Validates the build output.
- Unloads any other Maester module and imports the local build into the current PowerShell session.
Run the packaged tests with Invoke-Maester -Path ./module/maester-tests. Run
Build-LocalMaester.ps1 again whenever you change module or test source.
After changing files under ./report, include -BuildReport to build the report,
copy its generated template into the PowerShell assets, and include it in the
local module:
./build/Build-LocalMaester.ps1 -BuildReport
Build and load with VS Code
Press F5 with the PowerShell: Build and Load Local Maester launch
configuration selected. VS Code runs Build-LocalMaester.ps1 and leaves the
local build loaded in its interactive PowerShell session.
The consolidated module is the closest match to the artifact published in a
release. If you specifically need source-file breakpoints, use the source-only
workflow below; source breakpoints do not map to the generated
./module/Maester.psm1 file.
Source-only debugging
- Source files live in
./powershell(module functions) and./tests(bundled test suites). Never edit files in./module— it is generated build output. - For source-level breakpoints or quick iteration, load the PowerShell module directly from source. Repeat this whenever you change code in
./powershell.Import-Module ./powershell/Maester.psd1 -Force
- Run Maester
Invoke-Maester
- Before submitting a change, use
./build/Build-LocalMaester.ps1to verify the consolidated module.
Building the module
The publishable Maester module is produced by a build script that consolidates the source files into an optimized module for faster import:
- For normal development, run
./build/Build-LocalMaester.ps1to build, validate, and import the publishable module in one step. - To produce the artifact without validating or importing it, run
./build/Build-MaesterModule.ps1. ./moduleis a build artifact: it is ignored by git and never committed to source control. Built modules are attached to GitHub Releases and published to the PowerShell Gallery from CI.- The
FunctionsToExportlist in the builtMaester.psd1is auto-generated at build time from the public source files. Do not edit the built manifest manually. - The bundled test files in
./module/maester-testsare copied at build time from./tests. Do not edit build output manually.
Code style
- Use the One True Brace Style (OTBS): the opening brace goes on the same line as the statement.
- Use Pascal Case for all variable and parameter names.
- Use 4-space indentation. No tabs.
- Save all
.ps1and.psm1files as UTF-8 with BOM (utf8BOM). - Use approved PowerShell verbs only. Run
Get-Verbfor the authoritative list. - Avoid trailing whitespace. End every file with one blank line (a single trailing newline).
- Place comment-based help inside the function body (immediately after the opening brace), not above the
functionkeyword.
File organization
- One function per file, and the filename must match the function name exactly.
- Exported functions go in a group folder under
./powershell/public, internal ones under./powershell/internal. See Repository layout for which folder. - Built-in security checks are native tests in
./tests/<suite>/[<service>/]Test.<ID>.ps1, each with aTest.<ID>.mdbeside it. They are module source: the build defines their functions in the module.
Pester Tests
- QA tests for the Maester module framework itself are at
./powershell/tests. These are distinct from the bundled security test suites in./tests. - When making changes to the module you can run the QA tests locally by running
./powershell/tests/pester.ps1 - The PSScriptAnalyzer, PSFramework and PSModuleDevelopment modules are required to run the tests, install them with
Install-Module PSFramework, PSModuleDevelopment, PSScriptAnalyzer - The tests are run automatically on PRs and commits to the main branch and will fail if the tests do not pass
Contributing new tests and updating existing tests
Test folder convention
Every built-in check is a native test: Test.<ID>.ps1 plus Test.<ID>.md, in the tests folder of its suite:
/maester- Maester tests (MT.xxxx), with a subfolder per service such as/entra,/exchange,/teams/maester/xspm- Exposure management tests (MT IDs, with their own suite)/cisa- CISA tests, with a subfolder per service/cis- CIS tests/eidsca- EIDSCA tests (generated, see below)/orca- ORCA tests (generated bybuild/orca/Update-OrcaTests.ps1)/ad- Active Directory tests/custom- Folder for users to add tests (do not add any tests to this folder).
Each suite folder has a suite.json with the suite's ID, name and source. Folder names follow the
repository layout.
A test says which requirement of a framework it implements in its attribute, Control = 'cis-m365:5.1.5.1' or
Control = 'cisa-scuba:MS.AAD.3.1'. This is the same for a CIS or CISA test and for a Maester test that checks
what one of their requirements asks for.
The catalogue of each framework is a file beside the suite.json that declares it (Frameworks),
frameworks/<key>.json. It holds the name and version of the framework and every requirement with its facts: the
CIS level and profiles in tests/cis/frameworks/, and the CISA criticality, upstream status and NIST SP 800-53
references in tests/cisa/frameworks/cisa-scuba.json. It does not list tests. The module build and the unit tests
fail when a Control names one of these frameworks and a requirement its file does not have, and when a test in
tests/cis or tests/cisa has no Control for its suite's framework.
See Benchmarks and framework files and
Mapping a test to a framework.
Checklist for writing good tests
When contributing tests, please ensure the following:
Before writing the test
- Check if your new idea is not already covered by an existing test (you can also jump on the Maester Discord to discuss).
Get-MtTestlists every test. - Reserve a unique id for your test. See #️⃣ Pick next Maester test sequence number on how to reserve a unique id for your new test.
Writing the test
- Scaffold the files in the right suite folder, for example
New-MtTest -Id MT.1234 -Title '...' -Service Graph -Product entra -Feature conditional-access -Area authentication -Path ./tests/maester/entra, then follow Writing native tests. - Built-in tests must set
Product,Feature,Area,ResourceType,Severity,Mitre,Service(orNone) andAuthor(your GitHub handle) in the[MaesterTest]attribute, plusUserImpactandImplementationCostunlessSeverityisInfo, and describe every parameter. Choose the values with the attribute rubric, using keys frompowershell/assets/MaesterTaxonomy.psd1. They are checked on the pull request; see Attribute checks. - Do not add a
Tagfor the product, feature, area, suite, benchmark, licence or severity of a test, or for its ID: each of those has an attribute or is derived. - Do not check connections or licences in the test and do not wrap it in a
try/catchthat only reports-SkippedBecause Error: declareServiceandLicenseand let the engine handle it. The unit tests enforce this. - For a CIS or CISA test, set
Controlto the requirement it implements (Control = 'cis-m365:5.1.5.1','cis-github:1.2.2'or'cisa-scuba:MS.AAD.3.1'), and add the requirement to the framework file if it is new (tests/cis/frameworks/cis-m365.json,tests/cis/frameworks/cis-github.jsonortests/cisa/frameworks/cisa-scuba.json): itsId, and its level and profiles or its criticality. Do not copy the benchmark's text into the file. - Tunable values (thresholds, objects to exclude) are parameters of the test function, not hard-coded.
- The test's
.mdfile explains the test in detail and provides all the context required for the user to resolve the issue, including deep links to the admin portal page to resolve the issue. This will be shown to the user when they view the test report. The file should include:- Link to the admin portal blade where the setting can be configured
- A
#### Remediation actionsection, and<!--- Results --->followed by%TestResult%at the end - If there are multiple objects (e.g. list of CA policies, Users, etc) then use the
GraphObjectsandGraphObjectTypeparameters in Add-MtTestResultDetail. These include deep links to the admin portal. If the object type you wish is not available you can add it to Get-GraphObjectMarkdown.ps1. Feel free to ask on Discord if you need help with this.
- The test's page under
website/docs/tests/is generated from the test files; do not write it by hand. - Check the test with
Get-MtTest <ID>afterImport-Module ./powershell/Maester.psd1 -Force, and run it withInvoke-MtTest -Path <file>against a tenant.Get-MtTest -Path <file>applies the rules of a custom test, so it does not report a missing attribute or a key that is not in the taxonomy.
When in doubt always check the existing tests for the conventions used, feel free to discuss on Discord or GitHub Issues.
Before creating the Pull Request
Test your code
- We run a bunch of pester tests on your code when a PR is raised and will block merge until the issues are addressed.
- Before you submit the PR, run the tests locally by running
/powershell/tests/pester.ps1 - Fix any issues that are reported. If you need help see the
Common Pester test failures and how to fixsection below. Reach out on Discord if you need help. - The PSScriptAnalyzer, PSFramework and PSModuleDevelopment modules are required to run the tests, install them with
Install-Module PSFramework, PSModuleDevelopment, PSScriptAnalyzer - If a test is not applicable (e.g. it says not to use plural but the product name is AzureDevOps then you can add a
SuppressMessageAttributetag (see Invoke-Maester.ps1 which has suppression tags at the beginning of the function).
Attribute checks
A pull request that adds a test, or changes Product, RelatedProduct, Feature, Area, ResourceType, Severity, UserImpact, ImplementationCost or Mitre on an existing test, has those values checked against the attribute rubric in two ways:
- The unit tests in
NativeTestAttributes.Tests.ps1fail when a built-in test misses a required attribute, uses a key that is not in the taxonomy, lists a retired or unknown ATT&CK technique, or carries a tag for something an attribute already says. - The attribute-review check has a reviewer model read the test, its Markdown file and the rubric. It fails when a value does not fit the rubric, and comments on the pull request with the value it expected and the reason. Change the value, or explain in the pull request why the declared value fits the rubric. A maintainer can overrule the check.
The maintainer or agent who reviews the pull request applies the same rubric; AGENTS.md describes that step.
Updating EIDSCA tests and documentation
The EIDSCA tests and documentation are maintained in the EIDSCA repository → EidscaConfig.json file.
The /build/eidsca/Update-EidscaTests.ps1 script is used to generate the EIDSCA commands in the Maester module along with the EIDSCA tests and documentation.
The script is currently run manually and is not automated as part of the build process as we need to verify the changes before they are committed.
The illustration below shows the workflow for integrating EIDSCA tests and documentation into Maester.
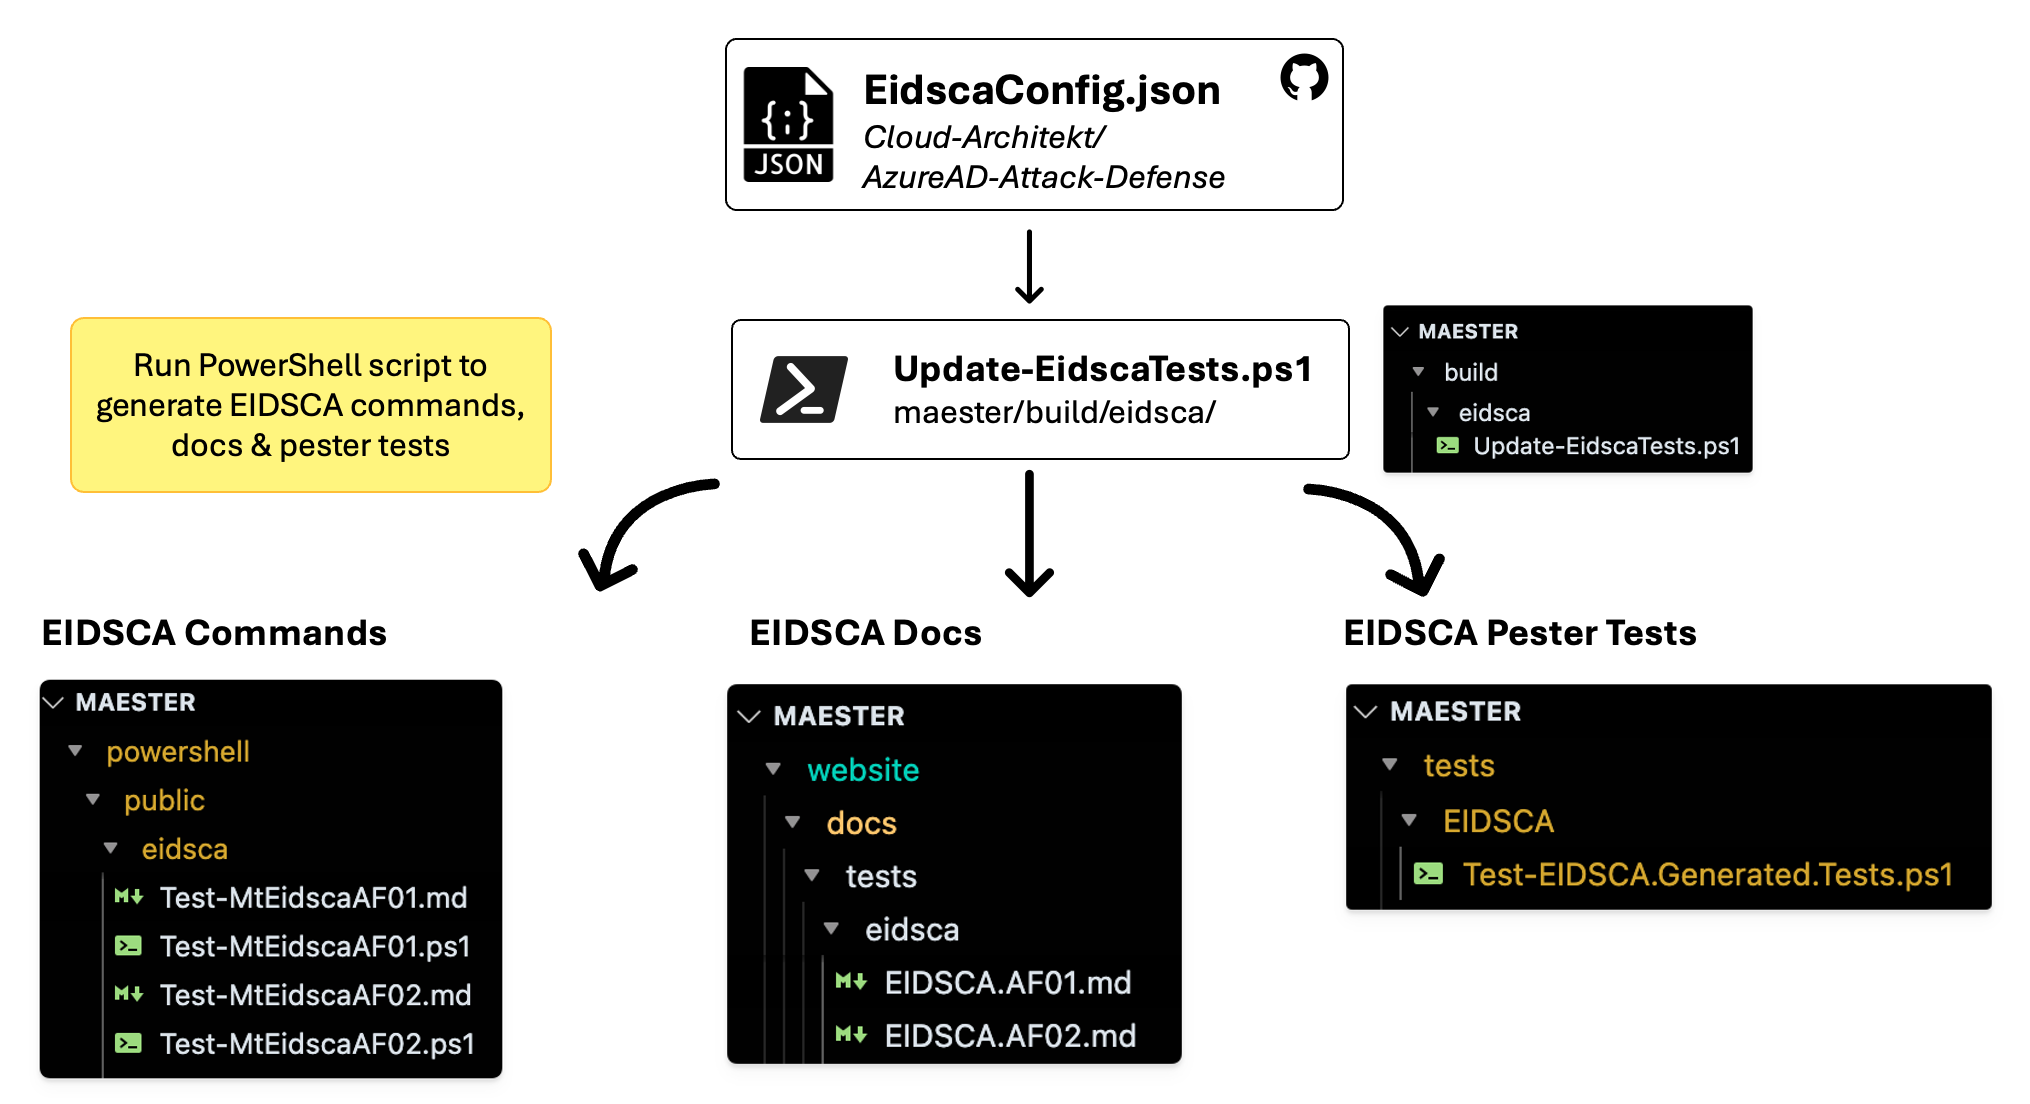
When generating the EIDSCA commands and tests, manual verification should be performed to ensure the EIDSCA tests are being run correctly and the results are accurate.
Common Pester test failures and how to fix
PSUseBOMForUnicodeEncodedFile
The quick fix for this is to run this script. Make sure you give the right path to the affected file.
$affectedFilePath = '/path/to/maester/powershell/public/run/Invoke-Maester.ps1'
$content = Get-Content $affectedFilePath -Raw; $content | Out-File $affectedFilePath -Encoding UTF8BOM
Contributing to Maester docs and blog posts
Simple edits can be made in the GitHub UI by selecting the Edit this page link at the bottom of each page or you can browse to the docs folder on GitHub.
For more complex changes, you can fork the repository and submit a pull request.
The docs/commands folder is auto-generated based on the comments in the PowerShell cmdlets. If you want to update the documentation for a command, you will need to update the comment-based help in the .ps1 file for the command.
Running documentation locally
The Maester.dev website is built using Docusaurus.
Follow this guide if you want to run the documentation locally and view changes in real-time.
Pre-requisites
Node.js version 24.0 or above (which can be checked by running node -v). When installing Node.js, you are recommended to check all checkboxes related to dependencies.
Installation
When running the documentation for the first time, you will need to install the dependencies. This can be done by running the following command in ./website folder.
npm install
Starting the site
While in the ./website folder, run the following command to start the site locally. This will start a local server and open the site in your default browser to http://localhost:3000/
npm start
Editing content
You will now be able to edit add and edit markdown files in the ./website/docs folder and see the changes in real-time in your browser.
- Read the markdown documentation for more information on some of the custom markdown features available.
- You can search for icons at Iconify and include them in the markdown. See the Daily Automation page for examples.
- The
Command Referencesection is auto-generated. To update the documentation for this, the .ps1 file for the command needs to be updated with comment-based documentation.
Site versioning
There are two versions of the Maester website:
- Production - This is the live version of the site that is updated whenever a new version of the Maester module is released.
- Preview - This is the version of the site that is updated with every commit to the main branch. This allows you to see changes before they are published to production.
| Environment | URL | Branch | Update Trigger |
|---|---|---|---|
| Production | https://maester.dev | website-prod | New Maester module release |
| Preview | https://preview.maester.dev | main | Every commit to the main branch |
When a new version of the Maester module is released, the documentation will be updated to reflect the changes in that version.
Version numbers
A preview is a prerelease of the release it leads to, and the docs show that release's number.
| Module on the PowerShell Gallery | Shown on the preview site | |
|---|---|---|
| Previews of 3.0 | 3.0.0-preview1, 3.0.0-preview2, ... | 3.0.0-preview |
| The release | 3.0.0 | 3.0.0 |
| Previews after it | 3.1.0-preview1, ... | 3.1.0-preview |
- A preview never uses up a release number, and every preview sorts below its release, so people on a preview are offered the release.
- The numbers are worked out by
.github/workflows/Get-NextModuleVersion.ps1from what is on the gallery. To start a new major version, raise$majorin.github/workflows/minor-version-update.ps1. - PowerShell installs
3.0.0-preview2and3.0.0into the same folder. Someone who has a preview moves to the release withInstall-Module Maester -Force; Maester tells them so when it starts.
Urgent changes to blog posts and documentation
If a blog post or doc change is urgent and cannot wait till the next release, create a PR against the website-prod branch directly.
Once that is reviewed and merged, you will need to create another PR to bring the changes into the main branch.
This is because the website-prod branch is deleted and recreated with every Maester module release to ensure it is always in sync with the released version of the module.
This process ensures any interim changes to the production site are intentional.